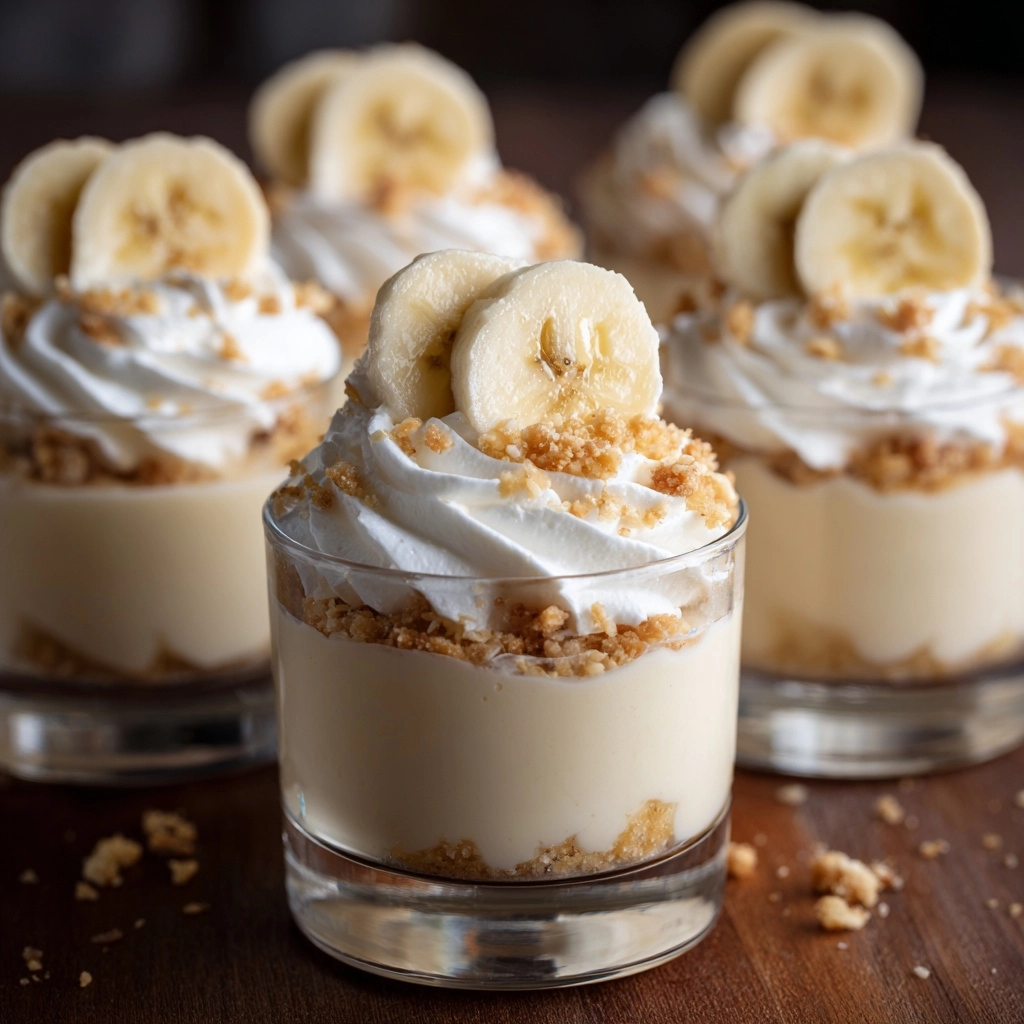
If you’re searching for a dessert that feels like a warm hug in a cup, look no further than Banana Pudding Cups. This classic Southern treat gets a playful twist when assembled in individual servings, making it perfect for parties, family nights, or anytime you want something sweet but unfussy. Creamy pudding, ripe bananas, and crunchy vanilla wafers layer together for a dreamy combination of flavors and textures that always brings a smile. Whether you’re a lifelong fan or a first-timer, these Banana Pudding Cups are sure to steal the show at your table.
Ingredients You’ll Need
-
Pudding Mixture
- 1 (3.4 oz) package instant vanilla pudding mix
- 2 cups cold whole milk
- 1 (14 oz) can sweetened condensed milk
- 1 tablespoon vanilla extract
Whipped Cream
- 1 ½ cups heavy whipping cream
Assembly
- 1 box vanilla wafer cookies
- 3–4 ripe bananas, sliced
- Whipped cream for topping (optional)
- Crushed vanilla wafers for garnish (optional)
How to Make Banana Pudding Cups
Step 1: Make the Pudding Base
Start by whisking together the instant vanilla pudding mix and cold whole milk in a large mixing bowl. It only takes about 2 minutes for the mixture to thicken up and get glossy. This is your foundation, so make sure there are no lumps—think smooth and luscious!
Step 2: Add Sweetness and Flavor
Once your pudding is thick, stir in the sweetened condensed milk and vanilla extract. This duo transforms the pudding, making it extra creamy and giving it that signature banana pudding taste you know and love. Keep stirring until everything is completely blended.
Step 3: Whip the Cream
In a separate bowl, whip the heavy cream until stiff peaks form. This step makes a world of difference, adding a light, airy texture. Take your time—when the cream holds its shape on the whisk, it’s ready to go.
Step 4: Fold and Combine
Gently fold the whipped cream into the pudding mixture. Be gentle here—you want to keep all that lovely volume you just whipped in. The resulting mixture should be smooth, creamy, and cloud-like.
Step 5: Layer the Banana Pudding Cups
Time for the fun part! Start by adding crushed vanilla wafers to the bottom of each serving cup. Next, add a layer of banana slices, then spoon over a generous layer of the pudding mixture. Repeat the layers as you like, finishing with a final dollop of pudding on top.
Step 6: Chill and Set
Cover your cups and pop them in the fridge for at least 2 hours. This step lets the flavors meld and gives the wafers that perfect, cake-like texture. Trust me, the wait is worth it!
Step 7: Add Toppings and Serve
Right before serving, top each cup with a swirl of whipped cream and a sprinkle of crushed vanilla wafers. This final flourish adds extra flair and makes your Banana Pudding Cups truly irresistible.
How to Serve Banana Pudding Cups

Garnishes
A classic swirl of whipped cream and a dusting of crushed vanilla wafers are my go-tos, but you can get creative here! Try a drizzle of caramel sauce, a few chocolate shavings, or even a fresh banana slice perched on top for a pop of color.
Side Dishes
Banana Pudding Cups are pretty much the star of any dessert spread, but if you want to round out the table, serve them alongside fresh berries or a platter of shortbread cookies. For a Southern-inspired feast, they’re perfect after fried chicken or barbecue.
Creative Ways to Present
Individual mason jars or clear plastic cups turn these into truly portable, party-ready treats. For a playful twist, try mini trifle bowls or even espresso glasses for a tasting menu vibe. Kids love assembling their own layers, too—just set out the ingredients and let everyone build their own Banana Pudding Cups!
Make Ahead and Storage
Storing Leftovers
Cover any leftover Banana Pudding Cups tightly with plastic wrap or lids and keep them in the fridge. They’ll stay delicious for up to 2 days, though the bananas may start to soften a bit after the first day.
Freezing
While you technically can freeze Banana Pudding Cups, I don’t really recommend it—the texture of the pudding and bananas can change, and the wafers may get soggy. They’re best enjoyed fresh or within a day or two of making.
Reheating
No need to reheat these treats—Banana Pudding Cups are meant to be enjoyed cold, straight from the fridge! If they’ve been sitting out for a bit, just pop them back in the fridge for a few minutes to chill again before serving.
FAQs
Can I use store-bought whipped topping instead of homemade whipped cream?
Absolutely! If you’re short on time, a tub of whipped topping works beautifully and still gives the pudding that fluffy, cloud-like layer we all love.
How far ahead can I assemble Banana Pudding Cups?
For the best flavor and texture, assemble them no more than 24 hours in advance. This gives the wafers a chance to soften just right without getting mushy.
What’s the best way to keep bananas from browning?
Use bananas that are ripe but not overly soft. You can also lightly brush the slices with a little lemon juice to slow down browning, but it’s usually not necessary if serving within a day.
Can I make a big batch instead of individual cups?
Definitely! Just layer all the ingredients in a trifle bowl or 9×13-inch dish for a family-style version. Scoop out servings with a big spoon—just as delicious, a little less fuss.
Are Banana Pudding Cups gluten-free?
As written, they aren’t gluten-free because of the vanilla wafers, but you can easily swap in gluten-free cookies for a version everyone can enjoy.
Final Thoughts
If you’re ready for a dessert that’s easy, nostalgic, and impossible to resist, Banana Pudding Cups are calling your name. Grab your spoons, gather your friends or family, and get ready to dig into a little cup of happiness!
Print
Banana Pudding Cups Recipe
- Prep Time: 20 minutes
- Cook Time: 0 minutes
- Total Time: 2 hours 20 minutes
- Yield: 6 servings 1x
- Category: Dessert
- Method: No-Bake
- Cuisine: American
- Diet: Vegetarian
Description
These Banana Pudding Cups are a deliciously creamy and layered no-bake dessert featuring classic vanilla pudding, ripe bananas, and crunchy vanilla wafers. Perfect for individual servings and easy to prepare ahead, they blend smooth pudding, fresh fruit, and crispy cookies for a delightful treat.
Ingredients
Pudding Mixture
- 1 (3.4 oz) package instant vanilla pudding mix
- 2 cups cold whole milk
- 1 (14 oz) can sweetened condensed milk
- 1 tablespoon vanilla extract
Whipped Cream
- 1 ½ cups heavy whipping cream
Assembly
- 1 box vanilla wafer cookies
- 3–4 ripe bananas, sliced
- Whipped cream for topping (optional)
- Crushed vanilla wafers for garnish (optional)
Instructions
- Prepare the Pudding: In a large mixing bowl, whisk together the instant vanilla pudding mix and cold milk for about 2 minutes until it thickens, then stir in the sweetened condensed milk and vanilla extract until well combined.
- Whip the Cream: In a separate bowl, whip the heavy cream until stiff peaks form, then gently fold it into the pudding mixture until smooth and evenly combined.
- Assemble the Cups: Layer crushed vanilla wafers at the bottom of each serving cup, followed by a layer of sliced bananas, then spoon the pudding mixture over the bananas.
- Repeat Layers: Repeat the layering of crushed wafers, banana slices, and pudding as desired, finishing with a final layer of pudding on top.
- Chill: Cover the assembled cups and chill in the refrigerator for at least 2 hours to allow flavors to meld and pudding to set.
- Garnish and Serve: Just before serving, top with additional whipped cream and crushed vanilla wafers if desired for added texture and presentation.
Notes
- You can substitute whipped topping such as Cool Whip for homemade whipped cream to save time.
- Use mini mason jars or clear plastic cups for a fun, portable presentation.
- Best served within 24 hours for the freshest texture and to avoid sogginess.
Nutrition
- Serving Size: 1 cup
- Calories: 370
- Sugar: 30g
- Sodium: 220mg
- Fat: 18g
- Saturated Fat: 11g
- Unsaturated Fat: 6g
- Trans Fat: 0g
- Carbohydrates: 47g
- Fiber: 1g
- Protein: 5g
- Cholesterol: 55mg