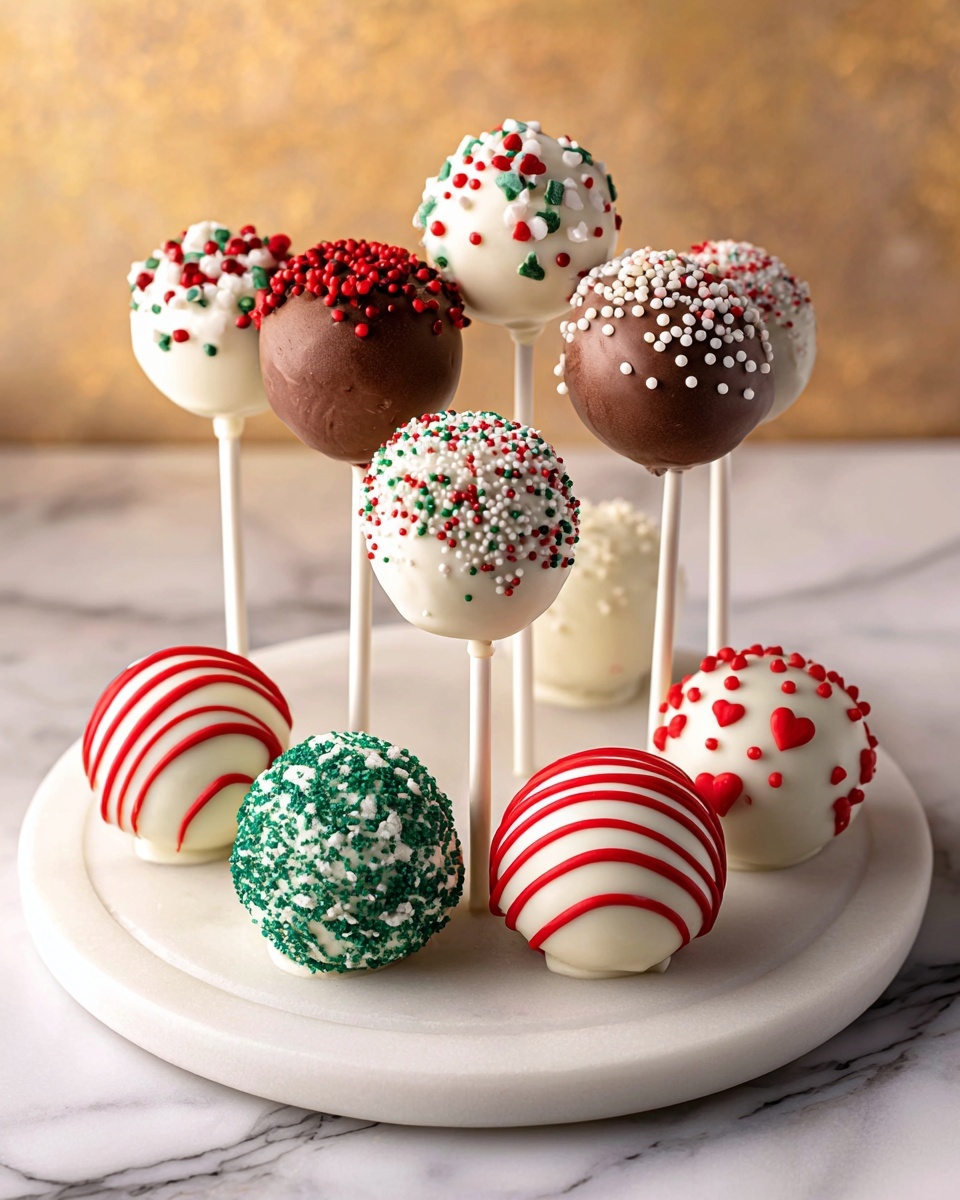
If you’re looking for a festive treat that’s as fun to make as it is to eat, you have to try this Christmas Cake Pops Recipe. These adorable little bites bring together moist cake, creamy frosting, and colorful chocolate coatings, all shaped into perfect bite-sized pops. Whether you’re decking the halls or gifting to friends, these cake pops capture the joyful spirit of the season in every single pop.

Ingredients You’ll Need
You don’t need a pantry full of obscure items to whip up these delightful dessert bites. Each ingredient plays a crucial role—from the base of your favorite cake flavor, to the smooth frosting that binds it all together, and the candy melts that give each pop its festive finish.
- 1 box of vanilla or chocolate cake mix: The foundation for your pops; pick your preferred flavor for a personalized touch.
- Ingredients required for the cake mix: Usually eggs, oil, and water—following the box instructions ensures perfect cake.
- ½ cup (120g) frosting: Acts as the glue for the cake crumbs; vanilla or chocolate complements your cake choice well.
- 12 oz (340g) white chocolate or candy melts: Choose festive colors—red, green, or classic white—to coat your cake pops beautifully.
- Assorted holiday sprinkles: Add sparkle and personality, making each pop look like a mini holiday masterpiece.
- 20–24 lollipop sticks: Essential for that classic cake pop look and easy handling during decorating and eating.
How to Make Christmas Cake Pops Recipe
Step 1: Bake the Cake
Start by preparing your cake mix according to the box instructions. The goal here is to bake a moist, tender cake that will crumble easily. Spread the batter evenly into a 9×13 inch pan and bake until a toothpick inserted comes out clean. Let it cool completely—the cooler the cake, the easier it is to work with in the next steps.
Step 2: Crumble and Mix
Once cooled, crumble the entire cake into a large mixing bowl. You want fine crumbs, so take your time breaking up any larger chunks. Next, add your ½ cup of frosting and gently mix everything together until the mixture sticks together well enough to form balls. This is where the magic starts to happen—your cake and frosting will transform into a malleable dough ready for shaping.
Step 3: Form the Balls
Pinch off small portions of your cake and frosting mixture and roll them into smooth balls about the size of a large truffle or walnut. Aim for uniform size to ensure even coating and presentation. Place these balls on a baking sheet lined with parchment paper and chill them in the fridge for 10-15 minutes, or until firm but not frozen.
Step 4: Coat the Cake Pops
While your cake balls chill, melt your white chocolate or candy melts in a microwave-safe bowl, heating in 30-second intervals and stirring until silky smooth. Dip the tip of a lollipop stick into the melted chocolate, then insert it halfway into the cake ball—this helps secure the stick inside. Now dip each cake pop fully into the melted coating, gently tapping off excess so it’s smoothly covered in a festive shell.
Step 5: Decorate
Before the coating sets, sprinkle on your holiday sprinkles to add that final festive flourish. Be creative! Layer different colors, mix textures, or even drizzle different candy melts to bring your Christmas Cake Pops Recipe to life with personality. Once decorated, stick the pops upright in a foam block or stand to dry completely.
How to Serve Christmas Cake Pops Recipe

Garnishes
Enhance your cake pops with a sprinkle of edible glitter, crushed peppermint, or even tiny fondant holly leaves. These simple touches take your pops from cute to absolutely charming and add that extra holiday cheer each bite deserves.
Side Dishes
While Christmas cake pops shine on their own, they pair marvelously with warm cups of hot cocoa or spicy mulled cider. Serving them alongside a cozy beverage makes for a delightful holiday snack experience that’ll warm hearts and satisfy sweet cravings.
Creative Ways to Present
Try arranging your Christmas Cake Pops Recipe in a festive mug filled with candy canes or red and green tissue paper. You can also wrap each pop in cellophane tied with a colorful ribbon for adorable edible gifts. Using a tray decorated with holiday ornaments is another great way to impress guests.
Make Ahead and Storage
Storing Leftovers
Store your cake pops in an airtight container in the refrigerator to keep them fresh and moist. They’ll stay delicious for up to five days, making them an easy make-ahead treat for holiday parties or unexpected guests.
Freezing
If you want to prepare well in advance, cake pops freeze beautifully. Place them upright on a baking sheet, freeze until solid, then transfer to a freezer-safe bag. They can be frozen for up to a month and thawed in the refrigerator when ready to enjoy.
Reheating
Since cake pops are best enjoyed chilled, reheating is generally not recommended. Instead, allow frozen pops to thaw gradually in the fridge to preserve their texture and flavor. If you’re craving warmth, pair with a hot drink instead!
FAQs
Can I use homemade cake instead of box mix?
Absolutely! Homemade cake works perfectly and can add a personal touch to your Christmas Cake Pops Recipe. Just be sure it’s moist and crumbly for the best results when forming the balls.
What can I use if I don’t have candy melts?
White chocolate or melting chocolate chips are excellent substitutes that coat smoothly and hold decorations well. You can even tint white chocolate with food coloring to get those festive colors.
How do I prevent cake pops from falling off the sticks?
Dip the stick tip in melted chocolate before pushing it into the cake ball; this ‘glue’ helps secure the ball to the stick and keeps it in place while dipping and drying.
Can I make these gluten-free?
Yes, just use a gluten-free cake mix and ensure your other ingredients like frosting and candy melts are certified gluten-free to keep your Christmas Cake Pops Recipe safe for all to enjoy.
What is the best way to store decorated cake pops before a party?
Keep them upright in a container or stand at room temperature if the room is cool and dry. Otherwise, refrigeration is great but avoid stacking so decorations don’t get damaged.
Final Thoughts
There’s nothing quite like biting into a festive, colorful Christmas Cake Pops Recipe that combines the spirit of the holidays with pure deliciousness. Whether you’re making them with kids, gifting them to friends, or simply treating yourself, these pops are sure to bring smiles all around. Give this recipe a try—you’ll find it’s as joyful to make as it is to share!
Print
Christmas Cake Pops Recipe
- Prep Time: 20 minutes
- Cook Time: 20 minutes
- Total Time: 40 minutes
- Yield: 20–24 cake pops 1x
- Category: Dessert
- Method: No-Cook
- Cuisine: American
Description
Celebrate the festive season with these delightful Christmas Cake Pops made from moist cake crumbled and mixed with creamy frosting, coated in colorful white chocolate or candy melts, and finished with vibrant holiday sprinkles. Perfect for parties and gifting during the holidays.
Ingredients
Cake and Frosting
- 1 box of vanilla or chocolate cake mix (plus ingredients required for the mix as indicated on box)
- ½ cup (120g) frosting (vanilla or chocolate, matching cake flavor)
Coating and Decoration
- 12 oz (340g) white chocolate or candy melts (red, green, or white)
- Assorted holiday sprinkles
- 20–24 lollipop sticks
Instructions
- Bake the Cake: Prepare and bake the cake according to the instructions on the cake mix box. Allow it to cool completely to room temperature before proceeding.
- Crumble and Mix: Once the cake has cooled, crumble it into a large bowl using your hands or a fork until fine crumbs are formed. Add ½ cup of frosting to the cake crumbs and mix thoroughly until combined into a dough-like consistency.
- Form the Balls: Using your hands, roll the mixture into 20–24 evenly sized balls, about 1 inch in diameter. Place the balls on a baking sheet lined with parchment paper and refrigerate for at least 15-20 minutes to firm up.
- Coat the Cake Pops: Melt the white chocolate or candy melts in a microwave-safe bowl in 30-second intervals, stirring between each until smooth. Dip the tip of each lollipop stick into the melted chocolate, then insert it halfway into each cake ball to secure the stick. After all sticks are inserted, dip each cake pop into the melted chocolate to coat it fully. Gently tap off any excess coating.
- Decorate: While the coating is still wet, sprinkle the cake pops with assorted holiday sprinkles. Place the pops upright in a styrofoam block or cake pop stand to allow the coating to harden completely at room temperature or in the refrigerator.
Notes
- Ensure the cake is fully cooled before crumbling to prevent the mixture from becoming too soggy.
- Use good quality candy melts or white chocolate for a smooth coating.
- To prevent chocolate from seizing, avoid getting any water into the melts when melting.
- These cake pops can be stored in an airtight container at room temperature for up to 2 days or refrigerated for up to 5 days.
- For easier dipping, keep the chocolate warm by microwaving in short bursts as needed.