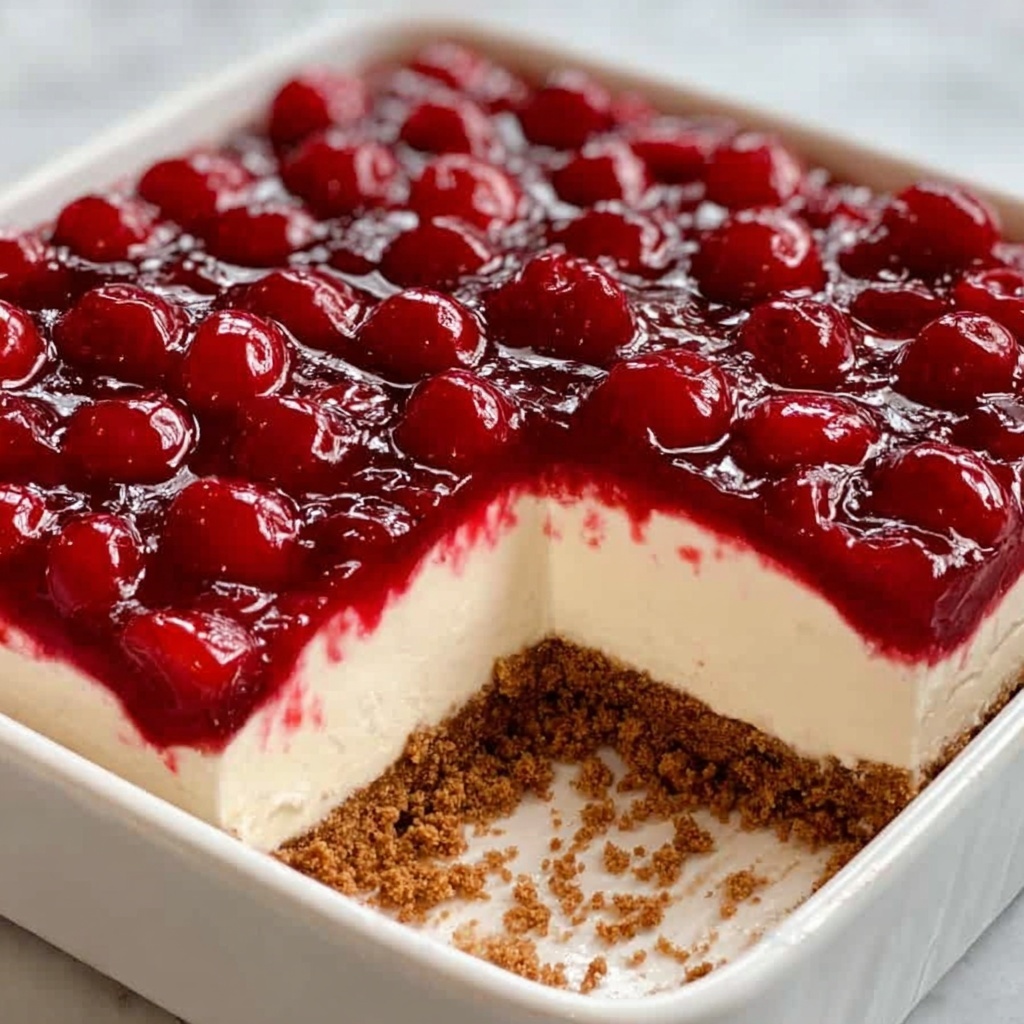
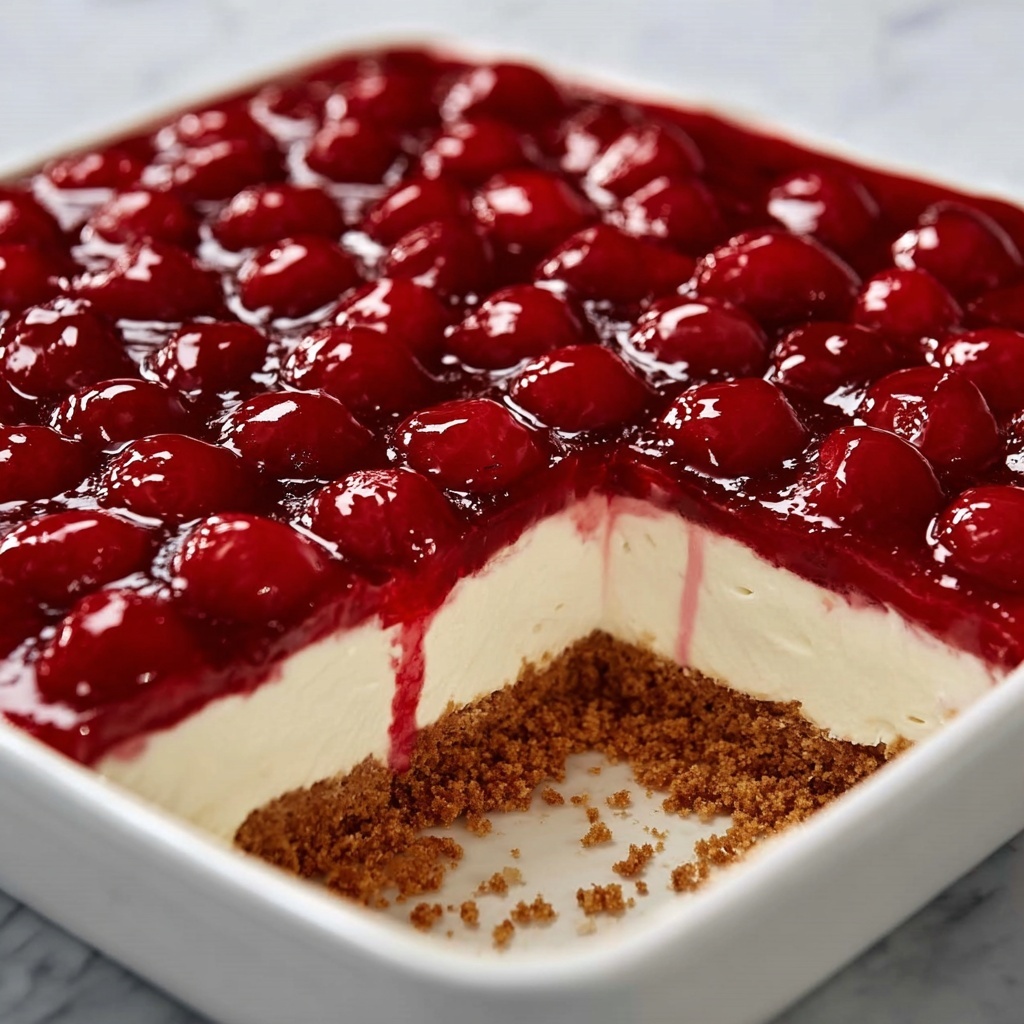
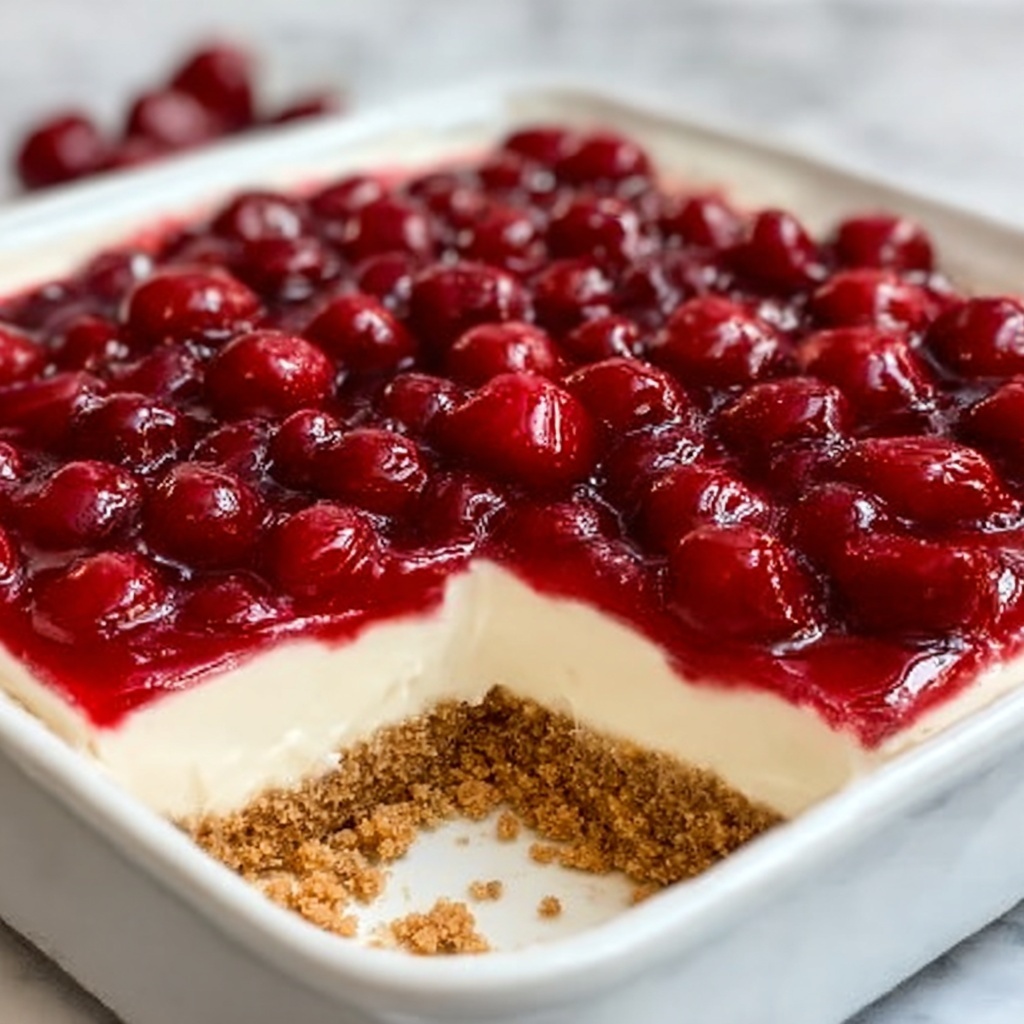
If you are looking for a dessert that combines sweet, tangy cherries with a creamy, dreamy filling and a buttery crust, then you have found your new favorite treat. This Classic Cherry Delight Recipe is a refreshing, no-bake dessert that brings together the perfect balance of flavors and textures. Whether you’re serving it at a holiday gathering, a casual potluck, or a sunny summer barbecue, this dessert will quickly become a crowd-pleaser. It’s easy to make, wonderfully satisfying, and filled with that nostalgic cherry charm that everyone loves.
Ingredients You’ll Need
The ingredients for this recipe are delightfully simple yet crucial for achieving the perfect texture and flavor combination. Each one plays an important part, from the crunchy, buttery crust that forms the dessert’s base to the light, fluffy cream cheese filling and the vibrant cherry topping that finishes it off with a burst of color and sweetness.
- Graham cracker crumbs: Provides a crunchy, slightly sweet base that holds the dessert together beautifully.
- Granulated sugar: Adds just the right amount of sweetness to the crust to balance the tart cherries.
- Unsalted butter, melted: Binds the crust ingredients and creates that rich, buttery flavor.
- Cream cheese, softened: Gives the filling its creamy texture and a subtle tang that pairs perfectly with the cherry topping.
- Powdered sugar: Sweetens the cream cheese filling smoothly without any graininess.
- Vanilla extract: Adds a warm vanilla note that enhances the overall flavor profile.
- Whipped topping: Lightens the filling, making it fluffy and airy for a melt-in-your-mouth sensation.
- Cherry pie filling: The star of the dish with its sweet, juicy cherries and glossy syrup, it crowns the dessert with classic cherry goodness.
How to Make Classic Cherry Delight Recipe
Step 1: Prepare the Crust
Start by mixing the graham cracker crumbs, granulated sugar, and melted butter in a medium bowl. This simple combination forms a rich and crumbly base that sets the stage for the delightful layers to come. Press this mixture firmly into the bottom of your dish to create an even crust, then pop it into the refrigerator to chill while you work on the creamy filling.
Step 2: Make the Creamy Filling
Next, beat the softened cream cheese until completely smooth and free of lumps—that’s the secret to a luscious filling. Gradually add the powdered sugar and vanilla extract, mixing well after each addition. Then, gently fold in the whipped topping to keep the texture light and fluffy. Spread this heavenly mixture evenly over the chilled crust, creating a creamy layer that invites you in.
Step 3: Add the Cherry Topping
The final touch is spooning the cherry pie filling over the cream cheese layer. Make sure to distribute it evenly so every bite delivers that burst of juicy cherries and glossy sweetness. Cover the dessert and refrigerate for at least 4 hours to let the flavors meld and the filling set perfectly, resulting in a delightfully cool and refreshing treat.
How to Serve Classic Cherry Delight Recipe
Garnishes
To elevate the look and taste, consider adding a few garnish options. A sprinkle of finely chopped toasted almonds or a few fresh mint leaves can add an appealing texture and a pop of color, while a dusting of powdered sugar enhances the dessert’s visual appeal. These thoughtful touches turn this simple dish into a delightful centerpiece.
Side Dishes
This recipe stands beautifully on its own as a dessert, but if you want to complement it, consider serving with a scoop of vanilla ice cream or a light dollop of freshly whipped cream. These additions bring an extra layer of creaminess that pairs wonderfully with the cherry topping’s brightness.
Creative Ways to Present
For an impressive presentation, try making individual servings in clear glasses or jars, layering crust, cream filling, and cherry topping for a visually stunning treat. Alternatively, use decorative dessert plates and add a drizzle of chocolate or caramel sauce for an indulgent twist that friends and family will rave about.
Make Ahead and Storage
Storing Leftovers
This delightful dessert keeps well when covered tightly in the refrigerator for up to 3 days. Storing it properly ensures the crust stays firm and the creamy layers remain fresh without absorbing other fridge odors.
Freezing
You can freeze the Classic Cherry Delight Recipe if you need to prepare in advance. Cover it tightly with plastic wrap and foil to avoid freezer burn and keep it frozen for up to one month. Thaw overnight in the refrigerator before serving to maintain the best texture.
Reheating
This dessert is meant to be enjoyed chilled, so reheating isn’t recommended. Instead, serve it directly from the fridge to experience the full effect of the creamy filling and the refreshing cherry topping.
FAQs
Can I use fresh cherries instead of canned cherry pie filling?
Absolutely! While canned cherry pie filling offers convenience and a consistent texture, fresh cherries cooked down with a bit of sugar and cornstarch make a fantastic homemade topping that adds a burst of natural flavor.
What can I substitute for the whipped topping?
You can make your own whipped cream from heavy cream whipped until soft peaks form. This homemade option gives the filling a richer texture and avoids any preservatives found in store-bought toppings.
Is this dessert suitable for vegetarians?
Yes, the Classic Cherry Delight Recipe is vegetarian-friendly since it doesn’t contain any meat or gelatin-based ingredients. Just be sure to check that your cherry pie filling is free from gelatin if you follow a strict vegetarian diet.
How can I make the crust gluten-free?
Simply substitute the graham cracker crumbs with gluten-free graham-style crumbs or crushed gluten-free cookies to accommodate gluten sensitivities without sacrificing that crunchy, buttery base.
Can I make this dessert in smaller or larger quantities?
Definitely! This recipe scales well. Use a smaller or larger dish and adjust ingredient amounts proportionally to suit the number of servings you need. Just keep an eye on the thickness of the layers to maintain the right balance.
Final Thoughts
There’s something truly special about the combination of creamy filling, buttery crust, and sweet cherry topping that makes the Classic Cherry Delight Recipe a timeless favorite. It’s simple to make, reliable, and guaranteed to bring smiles to any table. I encourage you to try this recipe soon, share it with your loved ones, and enjoy every delicious bite of this cherry-filled delight!
Print
Classic Cherry Delight Recipe
- Prep Time: 20 minutes
- Cook Time: 0 minutes
- Total Time: 4 hours 20 minutes
- Yield: 9–12 servings 1x
- Category: Dessert
- Method: No-Cook
- Cuisine: American
- Diet: Vegetarian
Description
Classic Cherry Delight is a luscious no-bake dessert featuring a crunchy graham cracker crust, a creamy vanilla-infused cream cheese filling, and a sweet cherry pie topping. Perfect for summer gatherings, holidays, or potlucks, this easy-to-make treat combines creamy and fruity flavors with a satisfying texture—all chilled to perfection.
Ingredients
For the crust:
- 1 1/2 cups graham cracker crumbs
- 1/3 cup granulated sugar
- 1/2 cup unsalted butter, melted
For the filling:
- 1 (8-ounce) package cream cheese, softened
- 1 cup powdered sugar
- 1 teaspoon vanilla extract
- 1 (8-ounce) tub whipped topping (like Cool Whip), thawed
For the topping:
- 1 (21-ounce) can cherry pie filling
Instructions
- Prepare the crust: In a medium bowl, combine graham cracker crumbs, granulated sugar, and melted butter. Press this mixture firmly into the bottom of a 9×9-inch or 9×13-inch dish depending on your preferred crust thickness. Place in the refrigerator to chill while preparing the filling.
- Make the filling: In a large mixing bowl, beat the softened cream cheese until smooth and creamy. Add powdered sugar and vanilla extract, mixing well until combined. Gently fold in the thawed whipped topping until the mixture is fluffy and evenly blended. Spread this filling evenly over the chilled crust and smooth the surface with a spatula.
- Add the cherry topping: Spoon the cherry pie filling evenly over the cream cheese layer, spreading it out carefully to cover the entire surface.
- Chill to set: Cover the dish and refrigerate for at least 4 hours to allow the dessert to firm up and the flavors to meld together.
- Serve: Once set, slice into 9 to 12 pieces and serve chilled for a refreshing and satisfying dessert.
Notes
- Use a hand mixer to beat the cream cheese filling for a smoother texture.
- For a homemade twist, substitute fresh whipped cream for the whipped topping and make your own cherry topping with fresh cherries.
- This dessert is ideal for holidays, potlucks, and summer gatherings due to its no-bake convenience and crowd-pleasing flavor.